Sunday, August 23, 2015

Training #4 - Skyline to the Sea -or- Pills and Poles

We are getting closer to the big hike.  We now have less than a month and a half to go.  Time to put in some serious miles.  The plan is to go long every other weekend leading up to the Grand Canyon.  Yesterday was one of these long hikes - Skyline to the Sea, with Gary and Greg.

Skyline to the Sea Elevation Profile

The hike starts at Saratoga Gap, where Highway 9 and Skyline cross.  You can also start from Castle Rock Park or if you are really ambitious, you can leave from Sanborn Park (longer and more elevation gain).  The distance of this hike is approximately 27 miles.  When you first read about the hike, you assume it is all downhill.  It is not.  The altitude gain is nearly 3000 feet!

Pam dropped us off at the top at just before 7 am.  As we pull our day hydration packs out of the back of the car, it is all wet - someone is leaking.  I assume it is me because I had a problem filling up at home.  It turns out that it was Gary.  His hose had pulled away from the bladder and all the water leaked out.  He reattached, reassembled and filled it up again.  Water started leaking out again.  A bit of panic as we refilled his bottle from what was left in the bladder.  We cut the tube and reattached again, but decided not to refill the bladder until we reached Big Basin.  Luckily it was not very hot.
Skyline to the Sea Trail

With that out of the way, we took off.  The pace was good.  The conversation was great.  The weather was perfect.  With a couple of short stops along the way, we reached Big Basin in the middle of the beautiful redwoods.  This was a good time to refill our bladders, empty our bladders:), and have lunch.  One of the things that we have all talked about a number of times was that the Rim-to-Rim hike is not the time to try something new.  Eat what you have eaten before, wear what you have worn before, drink what you have drank before.  So to my surprise, while we are sitting at the picnic table, Greg pulls out three cold beers.  We are planning to stop at Phantom Ranch in the Grand Canyon to have a beer before continuing.  Greg smiles and says "In the spirit of trying things out ahead of time...".  That beer tasted really good:)
Ibprofin

The rest of the hike was really nice.  The terrain changes multiple times as you make your way through the remainder of the redwoods, along the creek and toward the ocean.  You can feel the onshore breeze well before you can see the ocean.  Gary and I thought that you could see the ocean well before you actually can.  Maybe it was different 13 years ago when I last did this hike.

AleveI am sure you are asking - why does the title include "Pills and Poles"?  My two hiking buddies were both popping pills along the way in order to save their knees.  Gary the red pills, Greg the blue pills (Ibprofin and Aleve).  That together with all of us having poles, seemed to do the trick.  With the amount of downhill that this hike has, there is real risk of knee pain.  We made it and all felt good - tired, but good at the end!

Back to the hike.  We reached Waddell beach at around 4:45 pm.  Julie and Suzanne were waiting for us with sandwiches, fruit, snacks and beer.  Thank you so much - what a great way to end the hike!

Skyline to the Sea Waddell Beach
With this long hike done, we still have two more long ones, along with regular shorter hikes in between. Gary will be on vacation so will find some good hikes on his own.  Greg and I are likely to do Mt. Diablo next.  I am looking at some routes that will get us more than 500- feet of elevation and more than 20 miles of distance.  And then one more super challenging killer hike.  We plan to do the hike I just wrote about - but in the opposite direction, Sea to Skyline.  This will be the same ~27 miles, but with almost 6,000 feet of elevation gain.  Wish us luck!

Monday, August 3, 2015

Rim-to-Rim - What to Eat

We expect the hike to take 14-16 hours.  That is a lot of time on the trail.  We need to make sure we eat and drink right.  I will talk about eating first and drinking in another post.


The first thing to think about is what to eat the night before the hike, and in the morning before leaving.  My approach is always to have a good balanced meal the night before, making sure that you get a mix of protein and carbohydrates.  I don't totally buy into carbo-loading, but some good carbs will be included in what I eat.  I will also lay off the wine and beer.  And I will make sure that I drink a good amount of water.  All of that will leave me in the best state when I get up.

Breakfast is about eating what I have eaten lots of times before.  I will not try something new.  My go to meal is peanut butter and jelly sandwiches, on toasted whole wheat bread.  My stomach likes this.  And I think it is a decent combination of protein and carbohydrates again.  I will drink water.  And I will have coffee (I am a bit of a coffee prude so will bring my own to the hotel).  I am not sure coffee is right for everyone, but I am a big fan and have it all the time before I hike or bike.  It will not cause any problems, and I think the caffeine gets me going!

As an aside, I will make sure I am up at least an hour before we start hiking.  I need that time to enjoy my coffee and to give my body time to wake up, shower, go to the bathroom, and be in the right state of mind to enjoy the day. 

Once we get moving, I like to eat something every 45 minutes to 1 hour.  That can be a gel or bar.  I like to mix it up a bit, but mostly eat bars, making sure that I have one that is high in protein.  This is not an advertisement, but I am a Clif fan.  I like the ingredients, the way they quickly disappear from my mouth, and most importantly the way they make me feel.  I am not a fan of the blocks.  They stick to my teeth.

I have read a lot on nutrition and hiking.  I know that some people eat dried meat, dried fruit, crackers, cheese, etc. I will likely bring along a bit of fruit.  In the end, it is your own preference.  The main thing is that it be something that you are use to eating, in similar conditions (long day of exercise), and that you eat regularly.  It is really hard to recover if you bonk!

Last thing. When we get to Phantom Ranch, there is a good chance we will have a beer.  I don't typically drink beer on a hike, but it may happen this time:) Lets hope the carbonation is not a problem!

Tuesday, July 14, 2015

Half Dome!

Finally got the chance to do Half Dome.  One of my bucket list items!!


As part of preparing for the Rim-to-Rim, I decided that it was time to do one of my bucket list hikes - Half Dome.  I mentioned this to a number of people, including Gary and Greg who are doing the Rim-to-Rim with me.  Almost everyone that I asked said they wanted to do it - including my brother and family who were planning a trip out from Utah.  Very quickly we were up to 18 people!

The first step is getting enough permits.  I asked everyone who is going, along with their non hiking spouses, to apply.  We ended up with 17 submissions (we had a few people under 18 applying, so with non hiking spouses, that got us to this number).  For more, go to the Half Dome Permits page.  Long story short, we ended up with 3 permits, just enough.  All of the submissions really paid off.

The next step was to make sure that everyone is ready.  This is a challenging hike.  It is 14-16 miles with about 5,000' of climbing. And to end it all off, you have to go up the cables to get to the top of the dome.  The group planning to go were all in pretty good shape. But most for this kind of hike.  So I shared as much information as I could on the hike, what others say about it, etc.  I think it was eye opening and really helped.

Here is the list that I shared with all of our hikers
  • Water.  The recommendation is that you bring a gallon.  If you have a 3L CamelBak or similar, you should bring a bit more with you.  That's what I do.
  • Electrolytes.  It is a good idea to add something to your water or include a drink with electrolytes.  I am a fan of Cytomax, but there are lots of other choices. I don't like to mix this in my CamelBak.  I instead carry a bottle or two that have it pre-mixed.
  • Food.  You will need to eat.  Bring something that you have been eating on other hikes.  This is not a great time to try out something new.  I am a Cliff gel and bar fan.  I will bring some extra just in case.  I recommend eating regularly.  I like to eat every 45 minutes - 1 hour.
  • Hat.  We will be on the trail for a long time, sometimes in the shade and sometimes in the sun.  Might be worth bringing a hat. I look really bad in a hat but will be wearing one - sorry.  I will put lotion on as well.
  • Layers.  The temperature will vary a lot.  Best to bring layers so that you can take off or put on depending.
  • Sticks.  The down is hard on the knees.  I will bring mine and will carry them on the up but use them on the down.
  • Gloves.  You will need gloves for the cables. There are some at the beginning of the cables, but they are old and worn.  I recommend that you bring your own. I found a good article on gloves by a guy who has done half dome 40 times http://hikehalfdome.com/?s=Gloves. I went ahead and bought pairs for me and my kids. They are $6.12 on Amazon.
  • Harnesses.  I don't think you need these, but do what makes you feel safe.  If you are thinking of bringing a harness, read the post from the same guy who wrote the one above.  Use a real mountaineering harness, a homemade system could be worse than none at all http://hikehalfdome.com/?s=Harness.


Everyone that hiked was well prepared.

We started the hike  just after 6:00am.  The weather was great.  Almost everyone wore shorts and t-shirts and we were fine.  We parked in the trailhead lot in Curry Village.  We all started off together, but pretty quickly started to spread out.  Some of us met up along the way, and did all see each other at the top (all but two who decided not to go up the cables).  We then left the top separately and met back up at the bottom.

A few things of note.

  • We had a few people cramp.  Bring electrolytes.
  • We all drank a lot of water.  You need a gallon or more.  There is no water (unless you filter) up the trail.
  • Poles were definitely helpful on the down.
  • Go early.  It gets busy in the afternoon.  And especially busy at the waterfalls on the way down.
This is a GREAT hike.  I am so glad that I did it.  It was hard, but with training, not impossible.  It took us about 4 hours to make it to the top and another 3 hours to make it back down.  The beginning up the falls was hard.  The sub-dome, up the zig zag was the hardest part.  The cables were intimidating but actually not that hard. We all spent time on top enjoying the incredible view and the accomplishment.


There are so many great hikes in Yosemite that I have not done.  I think that I will check a few of them off first, but will definitely do Half Dome again!

Training #3 - Pacific Crest Trail, Sonora Pass to Leavitt Lake

The next training hike I want to share is Pacific Crest Trail, Sonora Pass to Leavitt Lake.


I have been looking for more good training hikes, and given that I spend a good deal of time up in Twain Harte, wanted something reasonably close by.  This hike is about an hour away, up highway 108 to Sonora Pass.  It is 18-20 miles, starts at ~9600', and spends the full hike between that and maximum of 10,900'. There is a lot of elevation gain and loss along the way. Not an easy hike!

There are good places to park near the trailhead (38.327835, -119.63723), which is marked with a Sonora Pass sign.  Across the road is a parking area with camping and picnic tables.  And along the road there is room for a number of cars as well.

The hike starts out with some trees, wildflowers and stream crossings as you work your way quickly up above treeline.  From here, you really feel like you are in another world.  The views of the mountains are awesome.  The peaks are rugged.  The trails are rough and rocky.  There is snow left even after the mile winter that we had - some of which you get to cross:)

As you hike along you are likely to run into backpackers who have been on the trail for months.  Most that I ran into were making their way from Mexico to Canada.  They all seemed pleased to see a "day hiker" as that meant they were close to the  highway.  One asked me if there was a town close.  Seems that he had been thinking of a Coke for the last few days, and had been dreaming about a human sized piece of French toast!

I did this hike two weeks ago and again last week. I was totally unprepared last time.  I didn't have my CamelBak backpack, poles, hat, jacket or Cliff bars. I wore two tee shirts, shorts, took along three water bottles and two peanut butter sandwiches, and put all of this in a drawstring backpack. I didn't have a full charge for my phone and lost battery charge before completing the hike.  I didn't have my backup battery to recharge along the way.  Not too smart, but everything worked out ok.

This time had all of my regular hiking stuff, and was given a inReach Explorer two way satellite communicator with navigation for Father's Day.  The hike was great.  Much less stressful, although long.  The climb out from the lake was a tiring.  The way back was really nice!

Thursday, June 18, 2015

Rim-to-Rim - Just the Facts

Looking for a hike that'll kick your ass and demand months of training? Head southwest and traverse the width of the Grand Canyon—here are 8 tips on how to do it. (Men's Fitness)

www.JagatJoraJaal.com
Thanks to www.JagatJoraJaal.com for the great picture above.

On to the facts about our Rim-to-Rim hike.

When: Early October
Distance: ~24 Miles
Direction: North to South
North Hotels: Grand Canyon Lodge - North Rim
South Hotels: Lots of Choices...
Depart: North Kaibab Trailhead (8241 feet)
Arrive: Bright Angel Trailhead (6860 feet)
Permit: Not Required (for a day hike)
Transportation: Our wives will drive around while we hike.  The drive is pretty long ~220 miles, 5 hours (an alternate is to take a Trans Canyon Shuttle).
Water: We will of course bring lots with us.  There are locations: North Kaibab at Cottonwood; in the valley at Phantom Ranch; and on Bright Angel at Indian Gardens.
Beer (and other stuff): Phantom Ranch:)

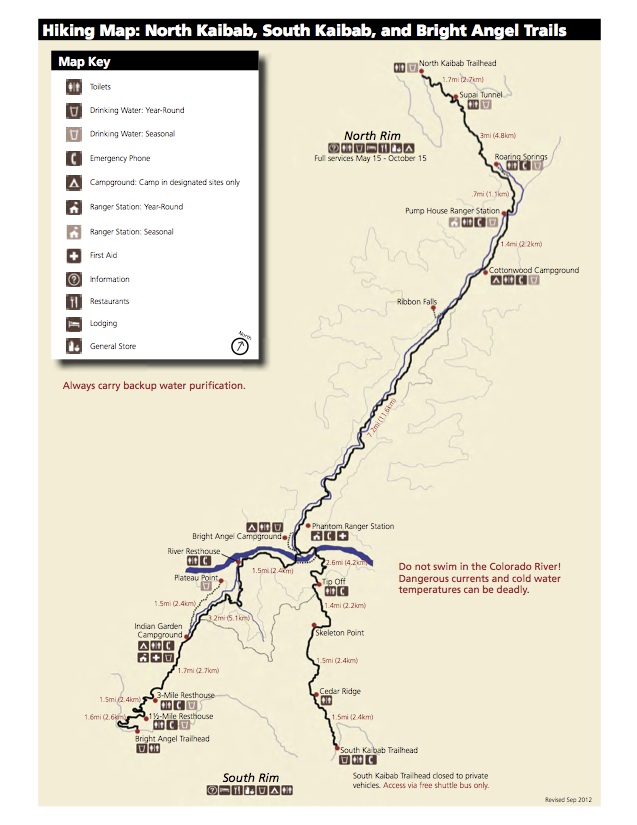
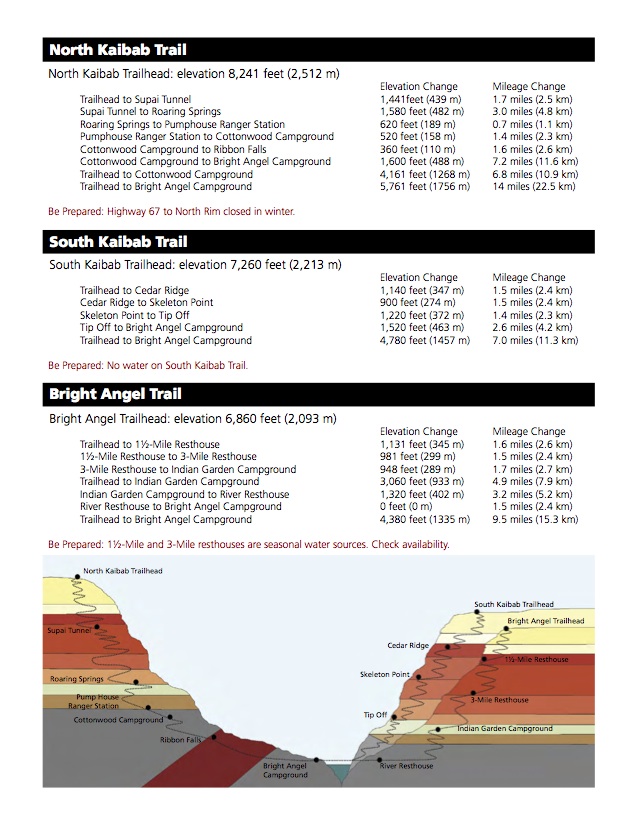
Here are maps that show the full route, distances, elevation, etc.

 Rim to Rim Map

In future posts, I will get into our plans for food and hydration!

Sunday, June 14, 2015

Poles or No Poles (aka Sticks, Trekking Poles)

How to use Hiking / Trekking Poles

How many times have you seen hikers with poles and thought - kind of whimpy...  I have.  I am now a believer.  I have changed my mind.  But it didn't start that way.

Since I started to take hiking more seriously, I have thought about whether I wanted or needed poles.  Knock on wood - I have never had any knee problems.  The worst I have had was a sore IT Band from riding my road bike a bit hard early in the season.  Nothing else.  So I didn't think that I needed them for my knees.  Even downhill has never been a problem.  And I have managed to stay in good enough shape that I assumed that I didn't need them to help me to finish a hike.

The Hike HouseAll of this started to change during a recent trip to Sedona.  I went to The Hike House to look at some new boots and to find a good trail.  While trying on just about every pair of boots in the store, I chatted with the sales guy.  He of course is a hiker, and maybe 25 years old.  We were talking about my planned Rim-to-Rim hike.  I asked him what he thought about poles.  He said he use to think they were for whimps.  But he no longer thinks that.  He said they are a must for a hike like I was going to do.  One guy's opinion.

Overlooking SedonaAfter finding a pair of boots and socks and buying them (more on my boots in a future post), I headed across the walkway to their Energy Cafe, where they have maps, trail food and coffee:).  I started talking to another guy about which hike I should take while in Sedona.  He wanted to know how far I wanted to go.  I was looking for a long and challenging hike, and he gave me one.  To the highest point in Sedona, almost 19 miles and a couple thousand feet of elevation gain.  But I digress.  We started talking about the Rim-to-Rim hike.  He has done it in a day - a number of times.  He just smiled and said I would LOVE IT.  I asked him what he thought about poles.  He didn't hesitate.  He said "you and your buddies have to use poles."  He said we will need them. They will help  on the downhill and we would be happy that we had them on the climb as well. Oh, and did I say he was in his mid to late 20's?!

That pretty much clenched it.  These guys were both young, fit and do a lot of hiking.

Pacemaker Expedition Hiking PolesI asked for poles for my birthday and my son Nick got them for me.  They are called Pacemaker Expedition. They are a pretty decent set.  They are adjustable.  They have an external lever locking mechanism.  They are lightweight and have cork grips.  And they do not have shock absorbers.  If you are looking for more information on poles, REI has a good summary "Trekking Poles and Hiking Staffs: How to Choose."  I have heard that poles are cheaper if you buy them at Sports Basement rather than REI, but I have not done the homework to know for sure.

I have since used them a number of times to practice.  I do think that they help on the downhill.  I can feel my upper body taking on some of the load that my knees would otherwise.  I am less convinced on the uphill.  I feel like I get more tired.  Kind of like doing the eliptical in the gym, where you work both your legs and arms.  I read the article "Ten Reasons for Trekking Poles" where their comments support my experience.

The final clencher was my recent hike (Training #2 - Sanborn Skyline Park to Castle Rock State Park). They really helped Greg.  He is in pretty good shape, but when his knees started to hurt, the poles helped him to make it down the hill.

I will not use my poles all of the time. But I will use them on long hikes, especially where there is a lot of elevation gain / loss - the Grand Canyon Rim-to-Rim for sure!

Saturday, May 30, 2015

Training #2 - Sanborn Skyline Park to Castle Rock State Park


Before I get into the training hike today, I want to thanks those of you who are reading my blog.  I shared one of the posts to Facebook and got a number of comments.  Thanks, keep these coming and feel free to comment directly on my blogger page.

I also want to comment on the Blogger update that I made.  I added the list of future topics to the right and moved down the block about me.  That block was just too long.  If you want to know more about me, you will have to scroll!

Now on to the hike.  Today was a good one, and I was joined by one of the two guys that are going to do this hike with me, Greg.  As one sentence of background - Greg is not a big hiker, but he is active and  has run a couple of half as well as a full marathon, so he is in good shape but will need a bit of time in the boot (just made that up, kind of like time in the saddle for biking) to be ready for the Rim-to-Rim.

We decided on a good long hike, with a lot of elevation gain.  The hike really doesn't have its own name as it starts in one park, heads over to another and then comes back.  As a result, it is called the Sanborn Skyline Park to Castle Rock State Park hike. It is about 16 miles with over 3,000 feet of elevation gain. The views are awesome.  The trails are beautiful, loaded with trees and mostly empty of people except near the entrances to the parks.  The link describes the hike as "an excellent training hike for High Sierra adventures like Yosemite's Half Dome."  This is perfect as we will be dong Half Dome in about a month and a half.


We arrived at Sanborn park just after 7.  The park does not open until 8, so we had to find a parking spot on the side of the road. From there, we were quickly on the trail and enjoying the hike.  The beginning of the trail is mostly up hill.  We worked our way up to the summit and along the top until dropping into Castle Rock.  We headed down until the end of the loop, climbed back up to the summit and then back down to where we started.

Sounds simple enough.  It was not.  This is a good, challenging hike.  We did well most of the hike.  As we began heading down for the last time, Greg's knees started to hurt.  Good thing I brought my poles (Pacemaker Expedition).  I had them with me to practice with as EVERYONE says I need to use poles for the Rim-to-Rim.  I was not convinced, and I am still not sure that I need them for much of the hike, but I am becoming more and more of a believer.  But given that this is a future topic, I will save the longer discussion for then.  What I will say is that the poles really helped Greg.  That and a few Ibuprofen.  He is now a full convert.  He had been looking at poles, trying to decide what which ones to go with.  After this hike, I expect he will have poles the next time we go out.

That's it for now, hope that this is interesting. Comment if you have a recommendation for what I should talk about next.